Another month has passed and we finally laid our first adobes yesterday morning! It took us a little over four and a half months to get to this point, as we broke ground on the foundation on June 1st of this year, so it really felt like a huge milestone. Before I discuss laying the adobes in the next post, I’ll back up and describe the finishing of the concrete grade beam and the work we did to prepare the foundation for wall construction.
Prior to adding the bracing and kickers to keep the concrete forms firmly in place during the pour, we installed the rigid foam insulation and rebar. It’s much easier to put rebar and insulation in the forms before you have wood spacers in the way. We cut 8″ strips of blue foam insulation and attached the strips inside the forms on the interior form boards. To attach the insulation, we drilled two holes through the form boards and all the way through the insulation. We threaded tie wire around the insulation and through the holes in the form, tying each strip of insulation tight to the form.
Rebar installation is pretty straight forward. I bent the rebar for the corners by measuring where on the stick of rebar I wanted the bend, putting a sneakered foot there, and pulling the stick up until the desired 90-degree angle was obtained. This is one of the more primitive methods for bending rebar, but when your foundation plan is fairly simple (like ours), it’s cheap and effective.
I enjoy tying sticks of rebar together. It gives me a warm, nostalgic feeling, as it reminds me of my days tying valve tags to pipes at the ol’ chemical plant in Kalama, Washington. I find great satisfaction in making a tight tie between two lengths of rebar.


I was pretty nervous when all the work on the forms was done and I was awaiting the pre-pour inspection. My friend (and our electrician) Sean came out prior to the inspection and looked things over. He thought it looked great, so that was a relief. He must have felt confident about our bracing, as we had a beer together and he sat on the form!
The inspector came out a few days before the scheduled pour. We walked around the forms together talking. He seemed to look fairly closely at how we did things. I showed him where the perforated pipe in the gravel trench drains and explained how we installed it. The inspector signed the permit and we talked for awhile about the walls and bond beam construction. We had some differing ideas on these topics, which stressed me out a bit, but we’ll get into that later. I appreciated that he took so much time out of his day to discuss these things with me, and I of course appreciated that he signed off on our foundation!

It was an overcast and cool September morning. I got to the site early and received a call from the woman at the concrete company. I mentioned that we had a little rain the day before, but the road was in good shape. I must not have been very convincing, because she called back 30 seconds later and explained that the driver and safety guy were going to come out and scope things out first. This would ultimately delay the start time of the pour, but I felt good about their coming. I had been worried about the truck being able to make it up our steep road and at least now we’d have someone come out first and make sure it would be okay.
The safety guy and driver came up in their pickup truck. They thought the road looked fine and wouldn’t be a problem at all. They left and the driver came rumbling up the driveway in the concrete truck about two hours later. The pour went about as well as it could have gone. We didn’t have any of the forms blowout from the weight of the concrete, which attested to the adequacy of our bracing work. We spilled only a little concrete outside the forms, and I had ordered just the right amount to finish the job. My friends worked hard and well together.
Sean spent a lot of time after the pour finishing the small 5′ x 5′ slab for the wood stove. He had to run into town to grab an edging trowel, but he returned quickly with the trowel and a case of cheap beer. We hung out as Sean worked. I had to leave shortly thereafter, as I had a 5 hour drive to get up to Santa Fe for the Earth USA conference. My friends stayed behind while Sean worked on the pad for a few hours. It was a good day.

When I returned from Santa Fe, we began pulling the forms. The forms came off fairly easily, except for places where the boards were on the inside of a corner. Those forms were squeezed really tightly together and were much harder to remove. Eventually, we got them all off and the grade beam looked really good. I was quite pleased with how the sides of the beam looked. There was a little efflorescence on the sides, but I was surprised with how smooth and neat the sides turned out.

After the forms were pulled, I spent a long day by myself painting emulsified asphalt on the top surface of the grade beam. This was done to prevent any moisture rising up via capillary action through the concrete and causing damage to the adobes that will be sitting on it. It also will hopefully prevent salts from similarly being pulled up from the concrete and into the wall. We had left the top surface of the grade beam rough to give the first mud mortar joint a good surface to bond with, but this made the task of painting the asphalt on much more daunting. I got the first coat on myself that day, but Megan and I had to spend additional time later filling in all the little pock marks.
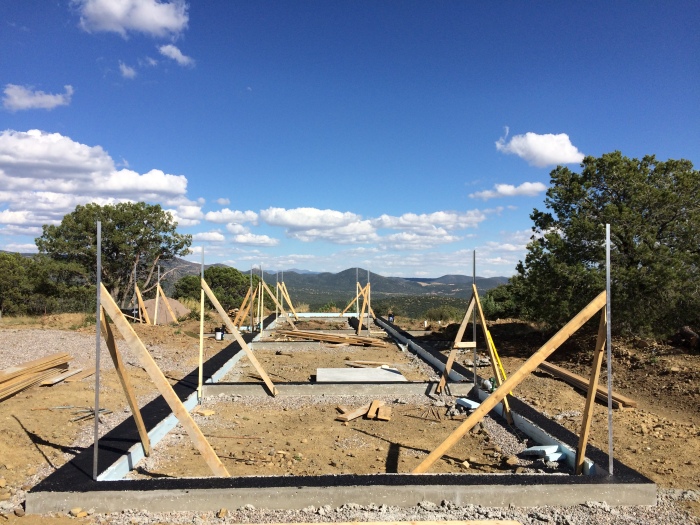
To further prepare the foundation for the wall construction, Daniel and I had to put up our story poles (or speed leads, as they’re sometimes called). The story poles are erected at the building corners, and string lines are run between them to guide the laying of each course of bricks. I’ll get more into that in my next post, but for now, let’s just say that they’re a very necessary part of any large-scale adobe project.
I had purchased in advance 14, 8-foot lengths of angled aluminum. I spent a Sunday morning with a horrendous Browns game on drilling holes in the aluminum where I planned to affix them to the concrete grade beam and to the wood braces.
Due to the concrete beam being wider on the north wall to accommodate the light straw-clay frame wall, it was necessary to install the story poles on the inside corners of the concrete. Given that our insulation was affixed to the inside face of the concrete, it was necessary to cut the insulation at the corners and remove it so that we could attach the poles directly to the concrete and have enough room to fit the drill in. To affix the story poles to the concrete we used anywhere from 2-3 tapcon screws. Allow me to state here and now that I really detest screwing into concrete. My drill has a hammer drill setting, which makes this task possible, but it is such a frustrating ordeal. First, I’d pre-drill the concrete with a masonry bit. Then, I’d try to get the tapcon screwed in. Usually it would go in about 2/3 of the way, and I’d have to hand tighten it with a socket wrench the rest of the way. Sometimes the head of the tapcon would break off and it would feel like one of the more frustrating things in life. A true hopeless feeling would set in momentarily and I’d have to start on a new hole. Some poles only needed two screws to be secured – others needed three.

After we had screwed a story pole to the concrete, we would use wood braces to plumb the poles in both directions. The wood would be screwed into the pole at one end, and screwed to a concrete stake in the ground at the other. I think we got them pretty well plumbed, however, if the concrete itself wasn’t well plumbed in the corner it caused some problems. I think we did a good job on these.

Once all the story poles were up, we started putting together the door rough bucks. Rough bucks are the wood frames that the pre-hung doors will eventually be attached to. They preserve the space needed for the doors. We decided to use 2×10 lumber for the door bucks, but I think I will use 2×6 lumber when we do the window bucks. In Silver City, it is nearly impossible to get a straight 2×10. I think we got our door bucks pretty well squared using bracing, but it was a frustrating task. Compared to our desired rough openings, we made our door bucks 2.5″ greater in height and 2″ greater in width. I sure hope that’s right!
Our inspector required us to use roofing felt on the sides of the wood that will come into contact with the adobes. We cut strips of roofing felt and stapled them to the wood. We would cut and assemble the door bucks and carry them to their location on the foundation. We’d then try our best to plumb the door bucks using 2×4 lumber and concrete stakes. Again, I think we did this pretty well, but I suppose we won’t really know until we actually install the doors.

The final preparatory step before laying the adobes was to cut notches in the story poles for our first course of bricks. Jared, our new friend from Las Cruces, came out to help, and I worked with him on notching the story poles. We measured 4 3/4″ up from the concrete on our first pole, and used a cordless angle grinder to cut the notches. I really wasn’t sure how big to make the first course, as the adobes have considerable variation in height, but we settled on 4 3/4″ and decided to see how it would go.
After notching the first pole, we used the transit level to mark and notch the other poles at exactly the same elevation. I don’t think we’ll do this for every course of notches, but it seemed a good idea to me to do this for the very first course. After a few course we can check again with transit to see how we’re doing.


If you made it through to the end of this post, congratulations! I know it was a long one, but we did a lot in the past month. In the next post I’ll describe our first day of laying adobes!

We had a friend whose whole job was form setting. Definitely a skill. You probably did more than you needed to keep the forms from blowing out but that’s OK. I think the sight of the concrete truck coming down the driveway is pretty imposing. Sounds like the company was being very careful, that’s good. Onward and upward with the adobes! You’re on your way. – Anne
LikeLike