Our permit drawings were approved! Our owner-builder construction permit was issued to us on May 19th. We were pleased that CID did not require any plan corrections to be made. CID mailed one set of the plans back to us and kept the other set. We were now able to get started with the construction of the house!
Before we could really get started building, some preparation of the buildsite was in order. First, there were two trees near the buildsite that had to come down. Neither Megan nor I felt good about cutting these beautiful trees down. Although they were technically outside the footprint of the house, many of the branches extended into the house area, and for fire safety reasons they would need to go anyway. Apart from these trees, very little other flora (aside from the native grass at the buildsite) needed to be removed.
Our friend Sean was willing to help us take the trees down. In addition to being a most-excellent electrician, Sean was also quite handy with a chainsaw. On the morning of Sunday, May 20th we met Sean up at the buildsite to take the trees down. Sean switched into beast mode and got to work as Megan and I dragged the cuttings away from where they fell. Within a few hours the trees were down and the site was so much more opened up. We felt a bit somber about making such a major change to the area, but we were happy that the first step in clearing the buildsite was complete.

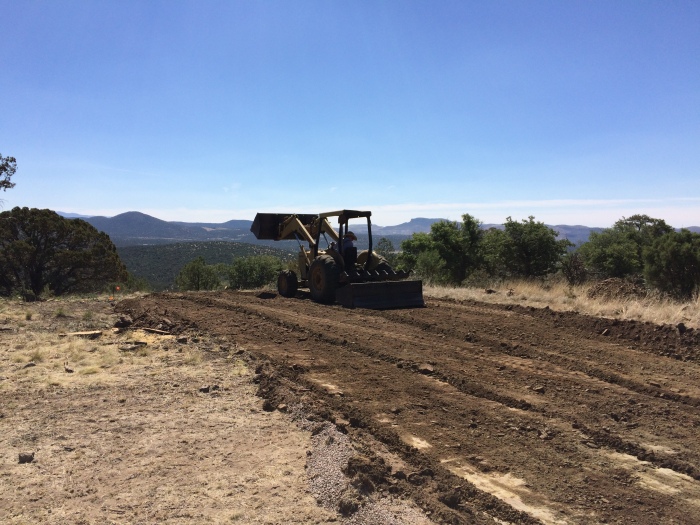
The next thing that had to be done was to level out the site. The area where the house was to be built was already fairly flat. With a transit level Megan and I measured the elevation difference between the east and west ends of the house. The difference was 3.5 feet elevation change over 87 feet of distance. The site would need to be flatter than that, so I asked Ken, a neighbor of ours, if he’d be interested in helping us level the site. Ken and his wife are retired and live downhill from our property not far away. They are good people, quite neighborly, and Ken loves to do tractor work.
Ken was happy to help, so he drove his tractor up to our place and met me in the morning on May 26. I mostly watched and busied myself with little tasks around the homesite while Ken went to work. We decided that best way to level the site was to cut into the high part of the slope, and drag it to fill in the low end. Ken’s tractor had a box-scraper attachment, which he’d use to first break up the hard clay soil and then drag the loosened soil out across the buildsite. Every so often, Ken would get stop the tractor and we’d shoot the grade with the transit level to see how we were doing. It took about 5 hours, but we got it looking pretty good by the end of the day.
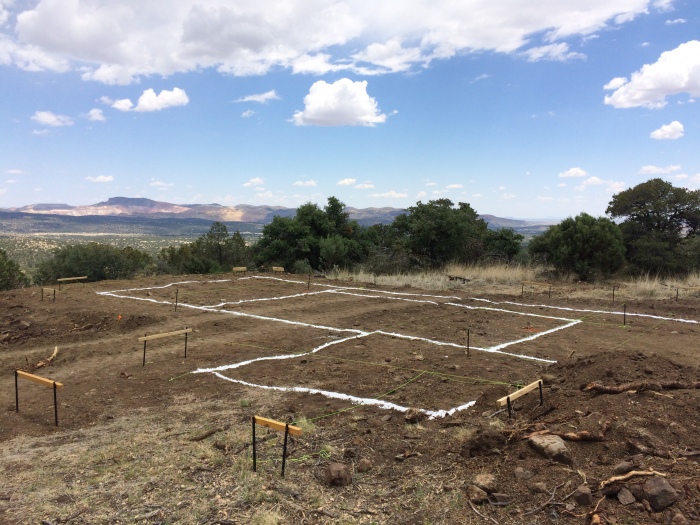
Now that the site had been leveled, I was excited to get batter boards up and to start laying out the exact placement of the house. Batter boards are made by driving two concrete stakes into the ground and attaching a piece of wood to connect them (technically, we drove one stake in first, screwed one end of the board to it, drove the other stake in, and screwed the board to the other stake). You then put a screw in the top of the board and your string line is attached to the screw. A batter board is needed at both ends of every wall. They should be placed several feet back from the actual ends of the walls, so as to not be in the way during construction.
The string line that connects the two batter boards represents the placement of the wall. The first wall is easy and choosing it’s location was a matter of preference. The subsequent walls needed to be placed precisely so as to ensure that the walls are square with respect to each other. Batter boards make sense because you can adjust the placement of the screw along the board to adjust the angle of the wall. I won’t go into further details on this subject now, but this is an important step that affects the entire house construction. It’s important to do this right!


On June 1st the guys who were going to be doing the septic system installation finally started the job. The septic installation had originally been scheduled to happen the last week of April, but for various reasons had been delayed. Unfortunately, due to the placement of the septic system, I couldn’t proceed much with the foundation work until the septic system was in place. Regardless, my friend Daniel, who I’d hired to work Thursdays and Fridays with me on the house construction, and I went out on June 1st to start digging the foundation footings in an out-of-the-way section of the house that wouldn’t interfere with the septic work.
We decided that we’d get a sense that day of whether or not we could dig the footings by hand. After about 4 hours of work the answer was clear – No! The ground was simply too hard, and although it could be done by hand, it made much more sense to get help from someone with an excavator. It was a good feeling to have finally gotten our shovels in the dirt, but we had to be realistic.
As the septic guys were leaving that day we stood around chatting for a few minutes. They already had an excavator up there for the septic work, and they suggested that when they were done using it for the septic installation they could spend a few hours helping me dig the footings. We tentatively set it up for the following Thursday, as they projected that they’d be done by that day.
Today is that following Thursday. Due to a flat tire on Monday, the septic installation was delayed a few more days. I met up with the septic guys today to discuss how we’d be moving forward. I should find out more tomorrow. One way or another, I plan to be digging those footings next week!
One other construction step to mention before I end this post. Once all the batter boards were up and there was a string line for every wall, we still needed to mark the placement of the walls on the ground. When working with an excavator, the strings can’t be up during the digging of the footings. I bought a 50 Lb sack of S-Type Lime, which is basically chalk (albeit, slightly corrosive chalk), for this purpose.
On the evening of June 4th, Megan and I laid out the chalk lines. We put up all the string lines and put the sack of lime in a wheelbarrow. Megan used a good ol’ fashion plumb bob to hang from the string line to show me where the chalk needed to go. I used an empty pinto bean can (New Mexico style, son!) to scoop lime out of the bag, and Megan would follow me with the plumb bob along each string line as I laid the chalk as neatly as I could. S-type lime is probably brighter than you’d imagine against a backdrop of tan dirt. The world grew dark around us as we finished up in the remaining daylight. We stood back and admired our work. It was starting to look like a house!

Hello all,
You have plenty of work ahead. I am planning on working on my adobe home myself here in Rio Rancho, New Mexico. I did also take the classes from Kurt about adobe construction. What kind of plans do you have for your home? Do they include a lot of glass your construction? What are the measuremenets of your home? What is the total square footage for your home? would you share, sale your home plans? I have one adobe home plan in mind, but it includes too much glass and I do ot feel like using too much glass in my home..
LikeLike
Congratulations on your upcoming build in Rio Rancho! New Mexico CID has a good guide that provides informations on what plans you need to include and what those plans need to show: http://www.rld.state.nm.us/uploads/FileLinks/49cda9a3a6f04aa9a169e9301ea1ebfc/BLDG_RES_GUIDE_070811.pdf
Rio Rancho and/or Sandoval County likely have some additional requirements, so you may want to check into their building/zoning departments as well.
Our design does have a lot of south-facing glazing. Windows on the other walls were kept to a minimum, but yes, there is a lot of glass on the south wall. We really designed the house with a primary focus on passive solar principles. We are also fortunate to have very beautiful surroundings and wanted the house to feel like a part of it’s natural surroundings.
LikeLike