Putting up the roof trusses feels like a major milestone, as for the first time, the house finally has it’s basic shape established. As of the publishing of this post, we have about 3/5ths of the trusses in place. Having figured out the rhythm of the process, the trusses go up at a good pace.

To begin this stage of construction we put up support posts on the exterior of the east and west walls for the gable end trusses. We got these support posts nice and plumb and sturdy. We then put up the two drop gable end trusses at each end of the house. This allowed us to tie string lines from end to end to make sure all our trusses would be square and level with each other. We ended up using three string lines: one at the peak and one at each overhang.
We then started adding trusses from the west end of the house. The truss adjacent to the gable end connected to the gable end with freeze blocks where the trusses sit on the walls, a freeze block between the bottom chords of the trusses, and a freeze block just below the peak of the trusses. We also set our outlookers, which are 2x4s that butt up against the second truss, span over the drop gable end truss, and extend out past the end of the house to allow for an overhang.

After these two trusses were up, the subsequent trusses were simpler. We would make sure that each truss was lined up in the center and along each wall, and sometimes we’d need to do some shimming to get things a little more level. Daniel would hold the truss as I nailed our blocking in. Once the four freeze blocks were nailed in, I’d check the spacing between the trusses at various locations. We’d typically need 1-2 additional blocks on each side of the truss to help maintain a consistent 22.5 inches spacing between the trusses. 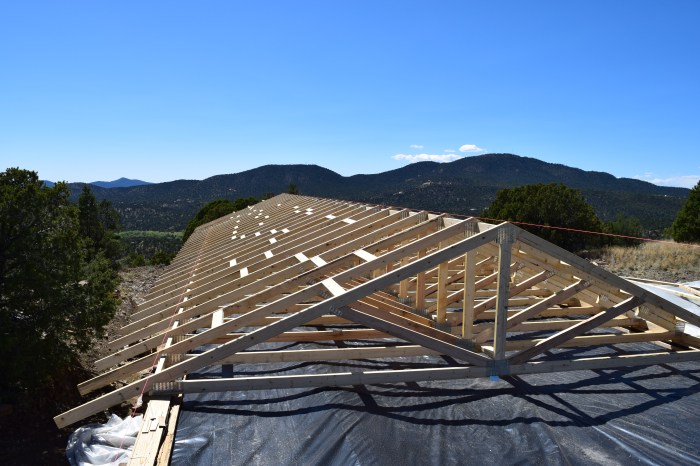


Ethan and Daniel,
Congratulations on reaching this milestone!
Also, the photographs illustrate very well the work you’ve accomplished.
Larry
LikeLike
Thanks! We appreciate you following our progress!
LikeLike
Hi, Ethan and Megan and Leo; Great to see the finished product starting to emerge. Everything lined up so perfectly! It will be good to be working indoors, I imagine.
– best, Anne
LikeLike
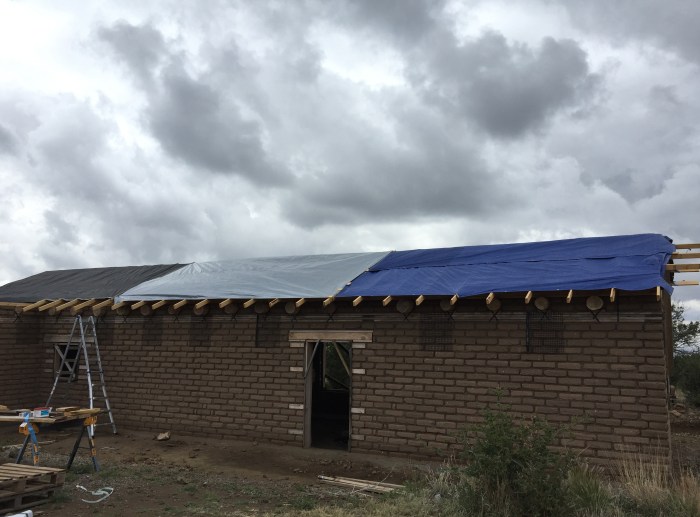
Yes, I’m ready to get a roof on this house already! We’re not quite there, but we’re getting closer. The trusses are all put up now. We still have a few things to finish up before the OSB can go on. Thanks again for following along!
LikeLike
Coming along nicely! Are you going to put a traditional tile roof on your house? Clay fired tiles are expensive and heavy, but you can buy synthetic tiles that look like the originals that are lighter and cheaper. They even have Spanish style tiles that you can build a solar roof with! .
LikeLike
Hi Chris, Thanks for your comments! We’re going to go with a standing seam metal roof. I do love how those clay tiles look, but we have a really nice local metal roof company that I’d like to support.
LikeLike
Just found this after seeing a link. Great coverage of all the details! We are from Santa Fe and just finished a cobb workshop w our friends Jeff and Melanie at the Silver Clay festival (know them? Def check out their house for serious inspiration of the highest level). We have land that we will build on north of SF and interested in doing cobb but not sure if ever permitted up here. Need to find some earth contacts to see if anyone knows. Using the term monolithic Adobe probably helps :-).
We also will be focusing on solar gain, natural materials, solar gain, wood stove, whole house exhaust fan, water harvesting, etc…
Any new word on just using a wood stove?
We will be doing a farm and have started w major irrigation infrastructure and planting trees and shrubs. We have a very strong well and large acequia rights. You have inspired me to start a blog and need to find a platform. More on my plate!
Looking forward to see your progress.
LikeLike
Hi Chris,
Thanks for visiting our website. I’m glad you enjoyed Jeff’s workshop – he and Melanie are good friends of ours and he is a great builder.
It sounds like you have big plans for your project and I wish you much success! It can always be helpful to get in touch with your local inspectors to ask questions about the permitting process. In my experience, inspectors appreciate inquisitive builders who want to go about things the right way. I’m sure your inspector could give you some great info on navigating the permitting process on a cob house.
As for having a wood stove as your only heat source, I was told by the plan reviewer at CID in Las Cruces that it is not allowed according to the way they interpret the residential IBC. Ultimately, I think you’d have to work it out with your particular inspector, but be aware that it could be an issue. They might require you to have some type of additional heat source.
Anyways, best of luck on your project and please continue to follow along with us as we build. Feel free to contact me with any additional questions you might have.
LikeLiked by 1 person