Here’s a new post in my effort to catch our intrepid readers up on some of our recent construction activities that I haven’t gotten fully into in previous posts. I’ll be detailing a method we employed for anchoring our bond beam to the adobe walls.
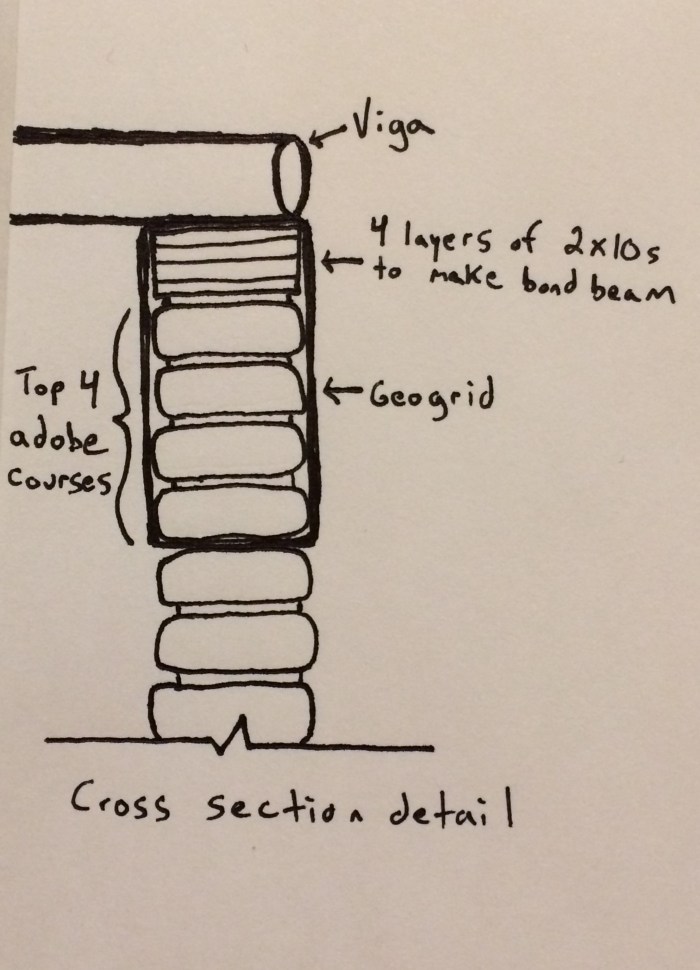
Firstly, the bond beam is an essential structural element in a masonry wall that serves to horizontally tie the walls together. The bond beam is installed at the top, or near the top, of masonry walls. Our bond beam will be built up using 4 layers of 2×10 lumber to make up a bond beam that is 6″ high and 10″ wide (same width as the adobe walls). This style of wooden bond beam is set in a mortar joint equivalent to the mortar joints used to build the adobe courses below.
Our CID inspector had early on expressed a concern about whether there would be an adequate amount of cohesion between the wood bond beam and the mortar joint. While countless adobe structures have successfully stood the test of time with only a mud joint and the weight of the roof keeping the bond beam securely in place, our inspector indicated that he would need us to provide an additional method of anchoring the bond beam to the adobe walls.
With help from the good folks at Adobe in Action, we devised a solution that the inspector agreed to. Our plan was to use 2′ wide strips of geogrid, spaced every 4′ along the walls and set in a mortar joint of the fourth-to-last adobe course, to wrap up and over the bond beam and secure the bond beam to the walls. Here’s a photo of my super cool drawing that I sent to the inspector:
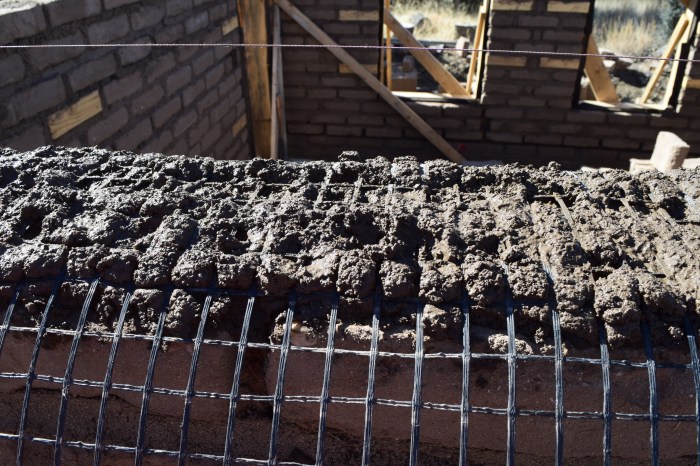
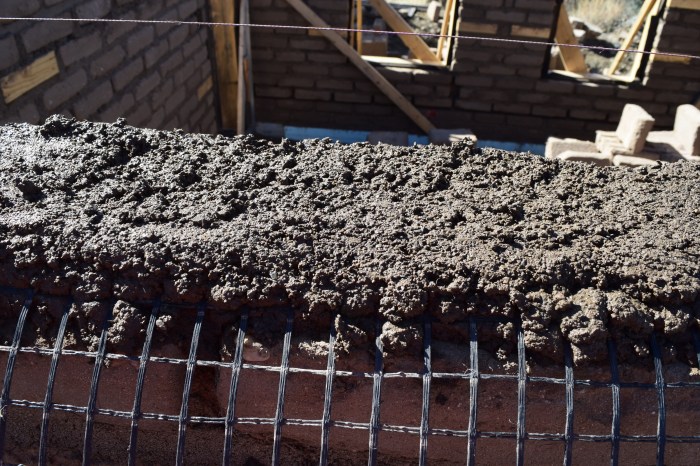
And here’s what geogrid looks like when your face is like 4 inches away from it:

Just prior to beginning the 17th adobe course, Megan and I took a trip to Mesilla, New Mexico to buy some geogrid off one of my adobe heroes, the legendary Pat Taylor. We arranged to meet up with him one sunny Sunday afternoon at his house after a trip to La Posta, one of the finest Mexican restaurants north of the border. We rolled out the length of grid we needed in the middle of the dirt road outside Pat’s adobe house from one of his 12′ wide rolls. We cut off the amount we needed, bent the roll in half, and Pat tied it with some rope he had laying around. We tossed the roll in the back of our truck, strapped it down, and went inside for a chat. We later paid the man a reasonable price and went with him to see an old adobe building just off Mesilla Plaza that Pat is in the process of restoring. Pat Taylor is simply the best!
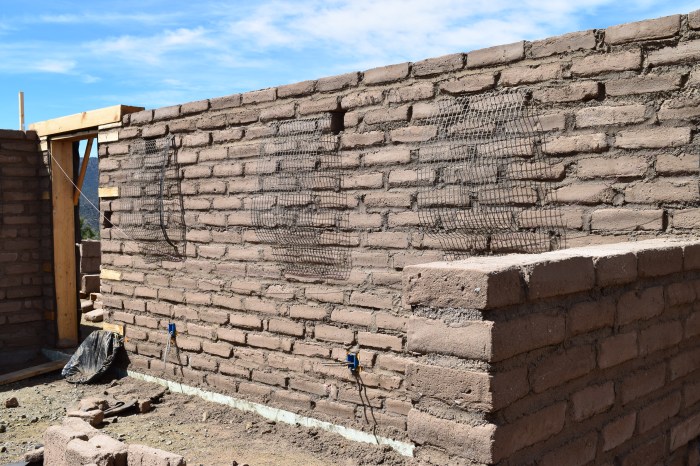
Okay, so back in our neck of the woods we start laying the 17th adobe course. Here are some photos showing the steps we took:
After getting a thin layer of mortar up on the wall, I’d take a strip of geogrid, make a temporary bend at the halfway mark, and set it in place atop the mud so that roughly half the grid was hanging over on each side of the wall. With the geogrid in place on the wall, I’d press it down into the mortar in order to position it in the middle of the mortar joint. (Prior to doing any of this, I calculated how long each strip would need to be in order to be set in the mortar joint, wrap over 4 courses of bricks and the bond beam, and then overlap fully on top of the bond beam to secure tightly to the wood)
Next, I’d add another thin layer of mortar to more fully cover the geogrid. The idea, again, was to end up with the geogrid somewhere in the middle of the mortar joint, and not directly touching the adobes above or below. Although that probably isn’t a major concern, we thought this effort would help the geogrid really get cemented in place.
I had to be careful not to make the mortar joint too thick, as the bricks were harder to wiggle down and level with the geogrid in the mortar bed like this. The geogrid would hold a lot of the mortar in when wiggling down the adobes, rather than allowing the excess to squeeze out as it usually does. We also used a slightly wetter mix consistency in order to make the wiggling down of the bricks easier.
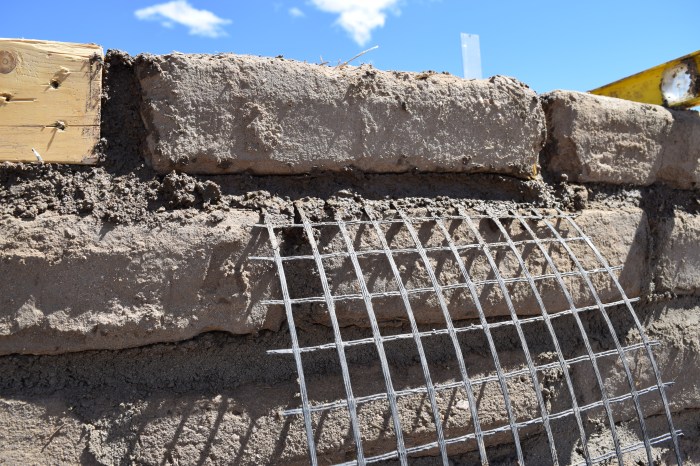
Although the photo above shows a geogrid strip thinner than the usual 2′ width being used, this is a good example of what the geogrid installation would look like after we set the brick above it. You can’t really tell that the geogrid was laid in the middle of the joint with the way it hangs down against the bricks, but trust me, it was!

We generally aimed to space the geogrid strips 4′ apart, but we sometimes had to adjust the spacing. Usually, we’d err on the side of closer spacing when possible, adding an extra strip to a length of wall, thereby reducing the space between them. Not wanting the geogrid to wrap over the lintels, as the plan is to leave the lintels exposed and not plastered over, we sometimes had to increase the spacing. In certain places, we’d opt to use a strip thinner than 2′ wide in order to fit in a corner, or fit between two lintels.
Well, that just about wraps up this topic for now. Once we’ve installed the bond beam and secured the geogrid to it I’ll add a second post detailing the rest of the process. This geogrid strapping is a simple, relatively cheap way of creating some additional anchoring between a wooden bond beam and an adobe wall. We hope to show that this method can be used in the state of New Mexico on permitted projects when necessary. Precedence, yo!

HI there, I’m really enjoying your journal. I’m learning SOOO much.
I notice in progress later that on the finished adobe walls and after the bond beam and vigas…you never wrapped the geogrid over the bond beam? I’m confused by this.
LikeLike
Hi Rochelle! Thank you so much for your interest and for reading about our project! We definitely wrapped the geogrid over the bond beam, but perhaps there are some photos that don’t show that. If you check out this post (https://visioncreationadobe.com/2018/10/28/vigas-atop-an-adobe-house/) there are several photos where you can see the geogrid wrapped over the bond beam.
I may not have included a detailed post on the attachment of the geogrid to the bond beam. We tried to get it as tight as possible as we wrapped it over the bond beam. We used 3″ screws and big washers to attach the geogrid to the top of the bond beam.
Unfortunately, after I attached all of the geogrid to the bond beam, the house continued to settle over time and the geogrid that had been super tight got looser than I had intended. If you think about it, there is a lot of weight added above the bond beam after the vigas, adobes between the vigas, and the entire roof structure are installed. I was able to re-tighten the geogrid using large staples hammered right into the adobe bricks, and smaller staples into the bond beam itself. If I did it again, I would try to wait longer before attaching the geogrid to the bond beam to allow more time for the house to settle.
I hope that clarification helps! I’m happy to answer any additional questions that you might have on this process. Thanks again for your interest and your comment!
LikeLike
what type of wood did you use , why use mortar instead of mud, and what did you do on the corners?
how many courses minimum should be on top of bond beam?
LikeLike
Hi Robert, thanks so much for your questions! We used 2×10 boards for the bond beam, although some folks will just use 6x10s so they don’t have to do the four layers of 2x10s (others opt to pour a concrete grade beam). With the four layers of boards to make up the bond beam, we made sure that the boards ended in different places on each layer. At the corners, we’d alternate the way the boards end, similar to how you end your adobes at the corners.
When I use the term “mortar” in this post, I just mean the same mud we use to lay the adobes. I call that mortar in the sense that it adheres the adobes to each other, but it’s just our clay/sand/water mix that we used.
I don’t know that there is a minimum number of courses needed above the bond beam. In our case, we had our vigas secured to the top of the bond beam, so we used two additional adobe courses to fill in the spaces between the vigas. You could do more or less than that and don’t necessarily need to do any adobe courses. It all depends on your design.
I hope that answers your questions but if I can clarify further, let me know! Thanks for reading!
LikeLike